

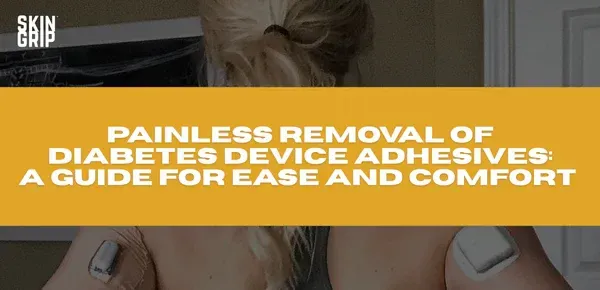
PAINLESS REMOVAL OF DIABETES DEVICE ADHESIVES: A GUIDE FOR EASE AND COMFORT
*Disclaimer: All content and information in this blog is for informational and educational purposes only.
Living with diabetes often requires the use of various medical devices, such as insulin pumps and continuous glucose monitoring systems (CGMs). While these diabetes devices have a crucial role in managing this condition, their removal can sometimes be uncomfortable or even painful. However, with the right techniques, you can minimize the amount of discomfort and make the process much more comfortable. In this blog post, we will explore practical tips on how to have a pain-free experience when removing these devices.
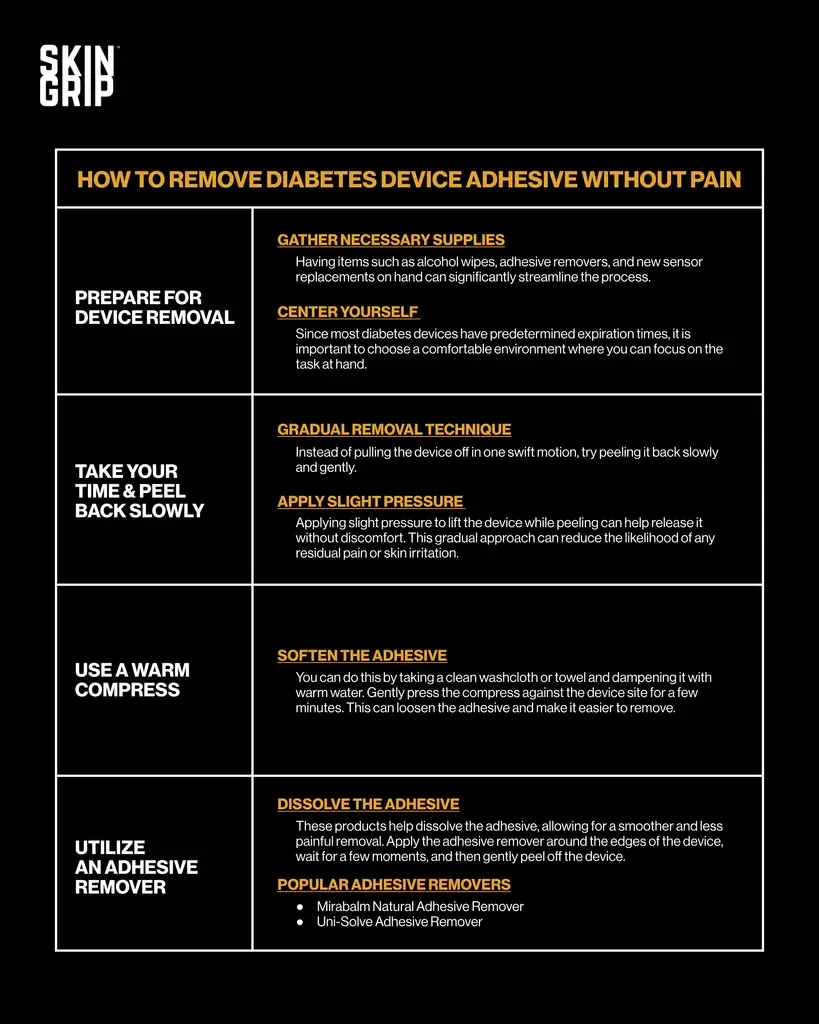
HOW TO REMOVE DIABETES DEVICE ADHESIVE WITHOUT PAIN
PREPARE FOR DEVICE REMOVAL
Before removing a diabetes device, it is crucial to gather the necessary supplies. Having items such as alcohol wipes, adhesive removers, and new sensor replacements on hand can significantly streamline the process. Once you have gathered all your supplies, take a moment to center yourself before proceeding with the device removal. Since most diabetes devices have predetermined expiration times, it is important to choose a comfortable environment where you can focus on the task at hand.
TAKE YOUR TIME & PEEL BACK SLOWLY
When removing the adhesive patches on your diabetes devices, a gradual removal technique can help. Instead of pulling the device off in one swift motion, try peeling it back slowly and gently. Applying slight pressure to lift the device while peeling can help release it without discomfort. This gradual approach can reduce the likelihood of any residual pain or skin irritation.
USE A WARM COMPRESS
If you are having a challenging time with removing the device, you might want to consider applying a warm compress to the device insertion site to help soften the adhesive. You can do this by taking a clean washcloth or towel and dampening it with warm water. Gently press the compress against the device site for a few minutes. This can loosen the adhesive and make it easier to remove.
UTILIZE AN ADHESIVE REMOVER
If the adhesive patch is particularly stubborn or causing discomfort, using an adhesive remover can make the removal process easier. These products help dissolve the adhesive, allowing for a smoother and less painful removal. Apply the adhesive remover around the edges of the device, wait for a few moments, and then gently peel off the device. Some popular adhesive removers include:
DEALING WITH LEFTOVER ADHESIVE RESIDUE
Once the device is removed, you may notice residual adhesive or residue left on the skin. To address this, apply a small amount of the adhesive remover to a cotton pad or swab and gently rub the affected area. This helps to dissolve any remaining adhesive and ensures a clean and adhesive-free surface. Alternatively, you can also use warm water or a mild soap to gently cleanse the skin, followed by patting the area dry with a soft towel.
SKIN CARE AFTERWARDS
Once you have successfully removed the diabetes device, it is essential to provide proper care to the removal area to promote healing and maintain skin integrity. After device removal, let the skin breathe freely without applying any creams, lotions, or ointments, unless specifically advised by your healthcare provider. Allowing the skin to recover naturally can aid in the healing process.
To give the skin a chance to continue breathing and recuperating, select a different area for your new diabetes device session. Site rotations can help prevent excessive strain on one particular area and reduce the risk of skin irritation or breakdown. It is crucial to allow the removal area to recover fully before applying any new device. This timeframe may vary depending on individual skin sensitivity and healing capacity.
Keep a close eye on the removal area for any signs of redness, swelling, pain, or discharge. These may indicate skin irritation or a potential infection. If you notice any concerning symptoms, it is advisable to consult your healthcare provider promptly.
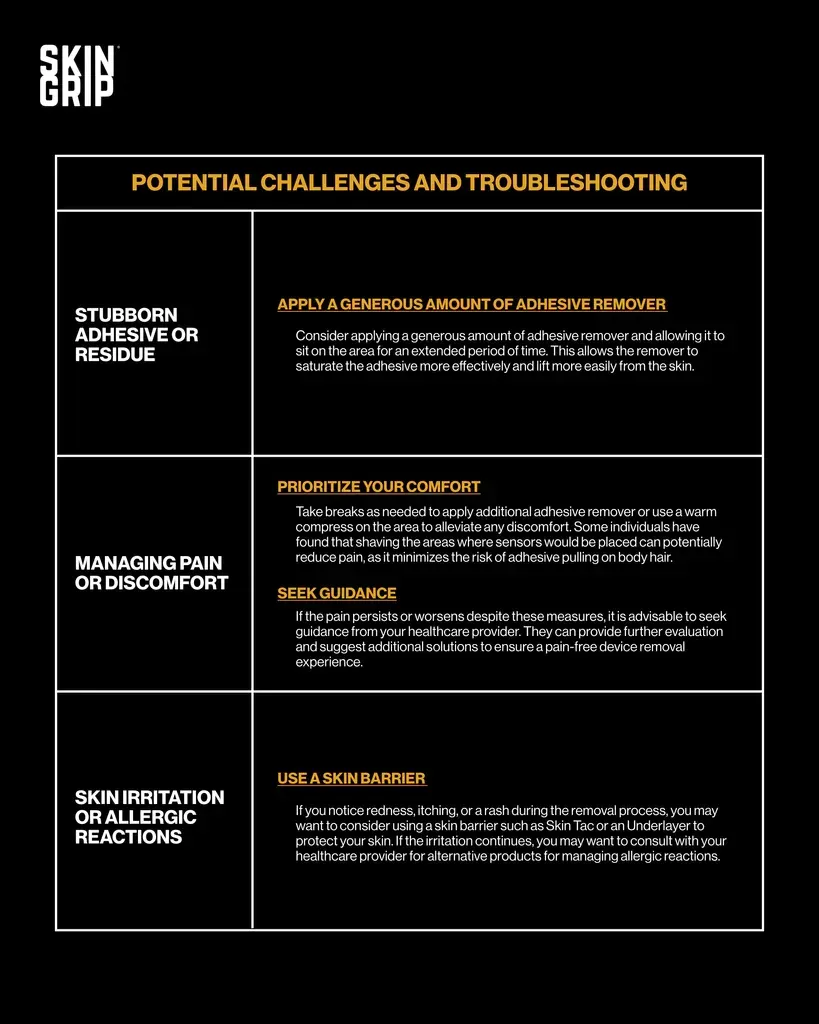
POTENTIAL CHALLENGES AND TROUBLESHOOTING
DEALING WITH STUBBORN ADHESIVE OR RESIDUE
If the adhesive or residue from your diabetes device is being particularly stubborn, you might consider applying a generous amount of adhesive remover and allowing it to sit on the area for an extended period of time. This allows the remover to saturate the adhesive more effectively and lift more easily from the skin.
MANAGING PAIN OR DISCOMFORT DURING THE REMOVAL PROCESS
During the removal process of a diabetes device, if you encounter pain or discomfort, it's important to prioritize your comfort. You can take breaks as needed to apply additional adhesive remover or use a warm compress on the area to alleviate any discomfort. Some individuals with diabetes have found that shaving the areas where sensors would be placed can potentially reduce pain, as it minimizes the risk of adhesive pulling on body hair. However, if the pain persists or worsens despite these measures, it is advisable to seek guidance from your healthcare provider. They can provide further evaluation and suggest additional solutions to ensure a pain-free device removal experience.
ADDRESSING SKIN IRRITATION OR ALLERGIC REACTIONS
In some cases, individuals may develop skin irritation or allergic reactions to their diabetes device adhesive. If you notice redness, itching, or a rash during the removal process, you may want to consider using a skin barrier such as Skin Tac or an Underlayer to protect your skin. If the irritation continues, you may want to consult with your healthcare provider for alternative products for managing allergic reactions.
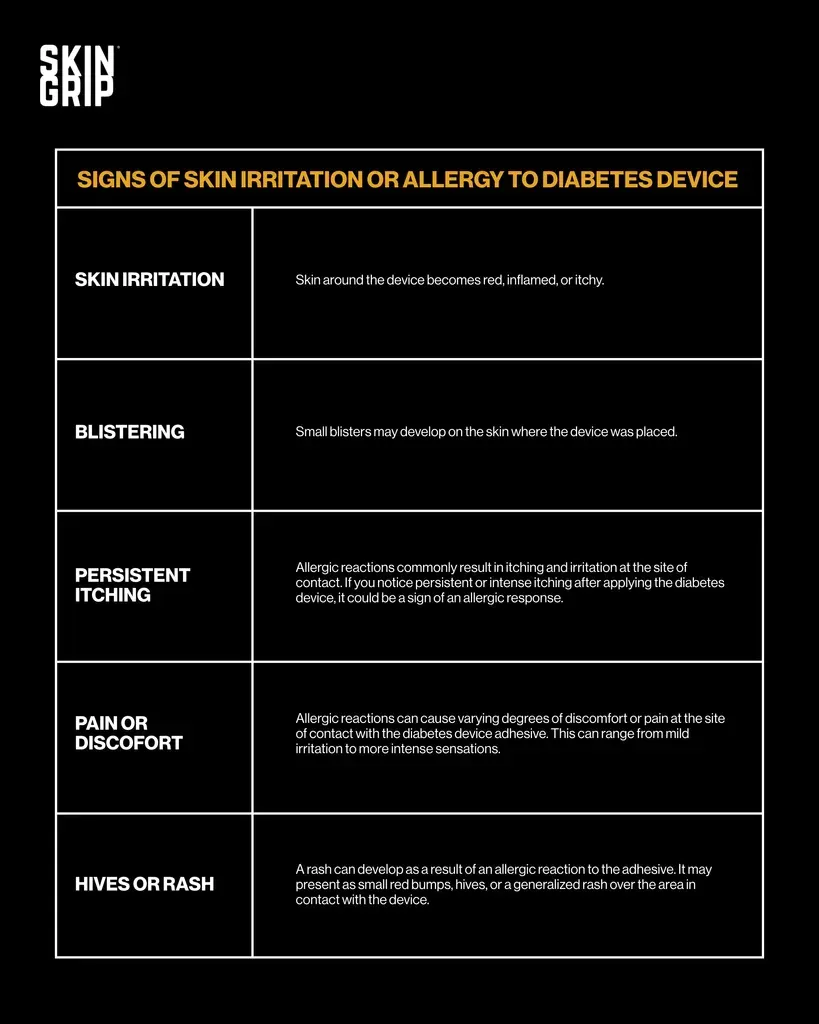
SIGNS OF SKIN IRRITATION OR ALLERGY TO DIABETES DEVICE
Some individuals with diabetes may develop an allergic reaction or skin irritation to the adhesive used in diabetes devices. It's important to be aware of the signs and symptoms of an allergic reaction so that appropriate measures can be taken. Below are the most common symptoms.
- Skin irritation: Skin around the device becomes red, inflamed, or itchy.
- Blistering: Small blisters may develop on the skin where the device was placed
- Persistent itching: Allergic reactions commonly result in itching and irritation at the site of contact. If you notice persistent or intense itching after applying the diabetes device, it could be a sign of an allergic response.
- Pain or discomfort: Allergic reactions can cause varying degrees of discomfort or pain at the site of contact with the diabetes device adhesive. This can range from mild irritation to more intense sensations.
- Hives or Rash: A rash can develop as a result of an allergic reaction to the adhesive. It may present as small red bumps, hives, or a generalized rash over the area in contact with the device.
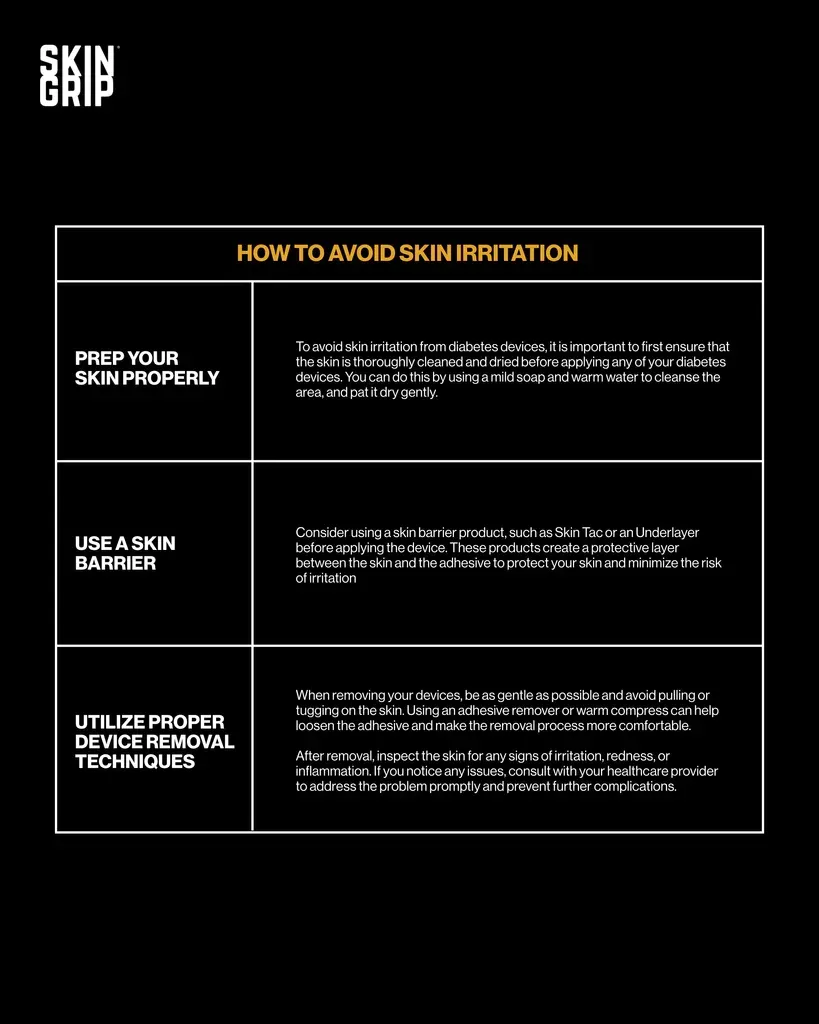
HOW TO AVOID SKIN IRRITATION FROM DIABETES DEVICES
To avoid skin irritation from diabetes devices, it is important to first ensure that the skin is thoroughly cleaned and dried before applying any of your diabetes devices. You can do this by using a mild soap and warm water to cleanse the area, and pat it dry gently. Avoid using products with alcohol or harsh chemicals as they can strip the skin of its natural oils and lead to dryness and irritation. Additionally, you might consider using a skin barrier product, such as Skin Tac or an Underlayer before applying the device. These products create a protective layer between the skin and the adhesive to protect your skin and minimize the risk of irritation.
Utilizing proper device removal techniques is also crucial in preventing skin irritation. When removing your devices, be as gentle as possible and avoid pulling or tugging on the skin. Using an adhesive remover or warm compress can help loosen the adhesive and make the removal process more comfortable. After removal, inspect the skin for any signs of irritation, redness, or inflammation. If you notice any issues, consult with your healthcare provider to address the problem promptly and prevent further complications.
Removing diabetes devices without pain is achievable with the right knowledge, techniques, and preparation. Remember, everyone's skin is unique, and what works for one person may not work for another. It's important to find the strategies and products that suit your skin type and individual needs. By following these tips and maintaining good skin care practices, you can reduce the risk of skin irritation and ensure a more comfortable experience with your diabetes devices.
This blog post was medically reviewed by Amanda Ciprich, MS, RD. Last updated on 8/9/23.

Healthy Bites